Page 1 of 2

The Rattly Tank Passed It's MOT!

Posted: Wed Mar 17, 2010 5:45 pm
by steve_earwig
A.K.A. What Lunatic Designed These Handbrakes? :evil:

As mentioned, my handbrakes were a bit crap so I thought this morning I'd take them to bits, give them a clean and stick them back together. I'd decided to change the cables because there was a horrible creaking noise from the handbrake at the end of its travel and looking underneath I could see the cable outer being dragged forward. It also had many more clicks than it had so I assumed it had also stretched and after what happened to VND I thought it was about time.

Having left it a bit late I only had the back cables from the factors here (the main being dealer only) so I thought I'd change them anyway while I was at it, that way if there was any problem with the main cable I'd be able to say it was in hand.

So I started with the left-hand side, took it all to bits and tried to remove the old cable. And tried. It seems like there's a captive nut inside the triangular bit where all the cables join and it's ROUND :shock: :frown: :evil: There's no way I could hold it. Ok, leave that until I get the main cable, carry on with cleaning up the handbrake drums and shoes.

The inside of the drums were all rust and brake dust, perfect friction material I don't think.

Then I started to put it back together - what a bastard!! I've done plenty of these on various cars, even on my D8, but I just couldn't get it all in there at the same time. The spring by the spreader is the worst, I couldn't get the shoes in the spreader and just force the spring in, I'd have to be heaps stronger in the fingers to do that. I had to get them roughly in place, get the spring in and force the shoes into the spreader. When I'd finally got it all in there, the disk/drum back on and adjusted the shoes I tried the handbrake - brrrrrrrrt! - all the way to the top :frown: The damn cable had come out of the spreader :x Start again :(

Needless to say the right-hand side shoes got cleaned in situ.

Interestingly, once I'd wound the adjusters up until they were skimming the drums again my handbrake is back to 5 or 6 clicks :? And there's no creaking noise now either.

And, in the MOT, I was watching the meters to see how good the handbrakes were but I needn't have bothered - the damn thing locked both wheels and the car jumped off the rollers 8)
Re: The Rattly Tank Passed It's MOT!

Posted: Wed Mar 17, 2010 9:37 pm
by DiscoPol
Congratulations !!!

Job well done (ish) Mr Earwig!!

Just how stringent is the vehicle annual check over there by the way? :twisted:

Re: The Rattly Tank Passed It's MOT!

Posted: Wed Mar 17, 2010 9:56 pm
by steve_earwig
Thanks :cheesy: It's expensive for a start - about 120 quid :shock: It's a long time since I took a car for a MOT back in Blighty so I don't know how much it's changed, but... Drive car in, open bonnet. Check chassis numbers, check brake fluid, looks new, don't bother with probe. Complain I still have my winter tyres on (there's still snow here and there). Check lights and horn. Forget to check wipers and washers (wiper marks on windscreen probably a give-away anyway). Check for bulb kit, warning triangle and first aid box (which I have to carry, even if I don't know first aid :roll: ) Drive onto rollers, front wheels brake, back wheels brake, handbrake erk! 8), drive forwards for emissions test. Probe up exhaust ( :shock: ), rev engine a few times. Retrieve readout. Drive over pit with wobble boards. One guy wiggles wheel, other guy checks for steering play. Engage wobble boards with guy with lead lamp still in the pit, first side to side - wheels go in and out worryingly, then back and forth - car goes up and down on rear suspension. Check headlights, fiddle with headlights. Pass.

Re: The Rattly Tank Passed It's MOT!

Posted: Thu Mar 18, 2010 1:40 am
by teamster1975
Great news Steve! The cables are a right pain in the @rse to change, I ended up doing all 3 because that adjuster was rusted solid, crap design :roll:

Re: The Rattly Tank Passed It's MOT!

Posted: Thu Mar 18, 2010 8:44 am
by mjb
steve_earwig wrote:Then I started to put it back together - what a bastard!! I've done plenty of these on various cars, even on my D8, but I just couldn't get it all in there at the same time. The spring by the spreader is the worst, I couldn't get the shoes in the spreader and just force the spring in, I'd have to be heaps stronger in the fingers to do that. I had to get them roughly in place, get the spring in and force the shoes into the spreader. When I'd finally got it all in there, the disk/drum back on and adjusted the shoes I tried the handbrake - brrrrrrrrt! - all the way to the top :frown: The damn cable had come out of the spreader :x Start again :(
Yeah those shoes are fun to reassemble... think i got it down to about 1.5hrs each side by the time i got the rear brakes sorted

Re: The Rattly Tank Passed It's MOT!

Posted: Thu Mar 18, 2010 9:18 am
by steve_earwig
I found if you hook the spring on a small screwdriver and stick the tip of it in the hole you can lever it so the spring is almost there, then it's just a case of ping, PING, clunk and it's all on the floor again :evil: :lol:

@Teamy - when I fist got the car it turned and I slapped a load of grease on it so it should have stayed like that. Trouble is there's absolutely no way I can clamp it with anything to stop it turning. I think the new one will be modified so it's square.

Ah well, it could be worse - apparently Mercedes C classes of the same age have a similar set up, they work ok until the springs snap and lock the wheel solid. Not fun at speed...

Re: The Rattly Tank Passed It's MOT!

Posted: Thu Mar 18, 2010 10:39 am
by VND
good news dude.
A rare handbrake related Win. :cheesy:

Re: The Rattly Tank Passed It's MOT!

Posted: Thu Mar 18, 2010 12:35 pm
by DaiRees
Good work Wiggy, keep it up! 8)

Re: The Rattly Tank Passed It's MOT!

Posted: Thu Mar 18, 2010 1:01 pm
by Doggy
Well done Steve 8)

Procedure doesn't sound that different from over here, apart from putting oil temp probe in place of dipstick prior to emission test.

Oh and large individual standing on tow ball, while hanging onto roof roof rails, to get rear brakes to actively participate in the retardation process.......

Re: The Rattly Tank Passed It's MOT!

Posted: Fri Mar 19, 2010 1:26 pm
by steve_earwig
Tbh I'm not sure they did the oil temperature probe, I was watching the guy at the back 'cos I'm sure one of the other guys there scratched my D8 with the exhaust probe :frown: You mean they have the wobble boards and the brake fluid tester in the UK now?

I picked up the new handbrake cable earlier and the first thing I noticed was... that I'm an idiot :oops: Of course I won't turn the adjustment nut against the round "captive nut" on the inside, there all one bluddy thing :roll: I'll take some pics tomorrow when I change them so you guys know what I'm wittering on about (I have to do them tomorrow 'cos the rear cables are straight out of the warehouse and nobody's paid for them yet because I'm still not sure they'll fit). I also got some new brake shoes (I hope my other half's ok with flowers nicked from somebody's garden for her birthday) 'cos the old ones look like crap. I wasn't going to but they were cheap and Mintex.

Re: The Rattly Tank Passed It's MOT!

Posted: Sat Mar 20, 2010 4:11 pm
by steve_earwig
All done :cheesy: I have new handbrake cables and shoes and it only took me 4.5 hours to do :(

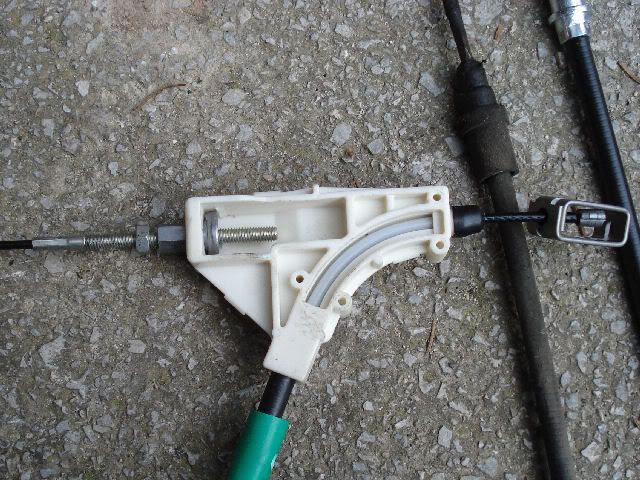
I was still wrong about the rear adjuster, there was a locknut, it was just the other side of the adjuster:
Image
It was just covered in grease and crud and I couldn't spot it. Once I cracked it, the thing came undone without a fight. In fact I was wondering all along if I really needed to do it, throwing money away when I don't have much to start with. This was right up to the point where I slid the main cable inner all the way forward and saw how the nylon sheath on the inner was starting to disintegrate and I could see the bare metal strands underneath. Not vital but it was going to need doing sooner or later.

So, highlight - I wanted to get the back end as high as possible and put the stands under the bottom arms at the bottom of the springs. I can't see anywhere else as secure and I knew I'd be under it a lot. Instead of sea-sawing it up, I put the jack under one of the arms further in. I was just about to stick the stands under it when the jack started sliding up the arm, with the back of the car moving over. Fortunately it stopped before the whole lot came down.

How many clips were holding the cable up? Service Box says 4, there were none :shock: I couldn't even see any holes for any - it just goes over the top of the heat shield and is free to vibrate on it:
Image
I cable tied the new one to the fuel tank cradle.

I must have had my thinking brain in today because reassembling the shoes only took 10-15 minutes a side this time. I didn't follow mjb's method (sorry but you've already got both hands holding the shoes against the spring so I'm not sure what you use to get the end of the cable in the spreader), not Haynes either. Bottom shoe in and hold with retaining spring, put the big spring in the bottom shoe and hook it in the top shoe, then force the top shoe into place on the backplate using the end stop to lever it against. Then offer up the spreader, hook the inner bit on the cable and the end of that on the bottom shoe, then pull the top shoe with its end resting on the stop plate around until there's enough clearance for the spreader and slip it in. The rest is a piece of cake.

It might have been a bad idea to do both shoes and cable at the same time, the first time I tried it on my sloping driveway it didn't seem to do anything, like pulling on a big rubber band while the car rolled backwards. I thought perhaps the shoes needed a chance to bed-in so I was pulling the handbrake up as I drove from my house to my wife's. Not enough to overheat it or anything, just mimicking gentle braking. As I was just coming up to my wife's house I gave it a bit harder pull and the back wheels locked... I guess I'll have to adjust the cables a bit more now :cheesy:

Re: The Rattly Tank Passed It's MOT!

Posted: Tue Mar 23, 2010 12:21 pm
by steve_earwig
All adjusted up and the centre console is back together finally :roll: The thing is, I'm reluctant to do a "how to" for this as the end result still isn't as good as it should be. Ok, I can yank it hard and lock the back wheels but that's not the point, I can't even imagine the handbrake was ever much good even when the car was new. The best I can do is eliminate all play from it, that way it doesn't take 6 clicks to go tight when all it's done is take up the slack...

There's also three types of handbrake.

Anyway, a few tips:
The inner is a pig to get out of the handbrake itself, put the lever all the way down, push the inner out of the slot with a small screwdriver, then pull the handbrake up and fiddle the inner out between the handbrake and the switch. The green end of the outer will come out of the base, with everything undone you need to put the handbrake down and give the cable a healthy tug from underneath.
Image

Of course, underneath the handbrake is a silencer so you can't actually see the damn thing. To pull the new cable in push some stiff wire through the hole, tape it to the inner and pull it up through the hole:
Image

Wiggle the inner back between the handbrake and the switch (through, up, down) put it in its slot and do the nut up so there's some thread out of the top. Hopefully you should see some of the green end (if not, go underneath and push the outer along the inner), get underneath, grab the outer in one hand, the inner in the other and PULL! -click!- Btw in the handbrake the inner cable end is square so it can't turn.

So, after pulling my handbrake on a few times while on the move to bed the shoes in, back in the air it goes (a bit safer this time too). Wheels off, callipers away, disks off, blow out dust, disks back. I adjusted them until the disks were stiff, then backed it off until the shoes are just touching in a couple of places, not enough to slow it down, just to make a noise. Then apply the handbrake and redo (4 times on the r/h side :roll: ) Then go underneath and start adjusting the slack. Adjust it until the disks start getting stiff (this is where it helps to take the callipers off because you can reach the disks from underneath), then back it off until the disks are just rubbing as before. If the centre console is off (and you actually have an adjuster there) it doesn't need to be too accurate because you can fine-tune it from there. Once you're happy pull the handbrake on a couple of times and recheck! When you're done lock the adjuster off and smear the whole thing in grease. Then move to the handbrake as necessary.

It was at this point I gave the handbrake a hard tug , something went clonk! and the cables were loose again, obviously I hadn't seated one of the ends properly. And back under the car I went :(

Without doing Incredible Hulk impressions I can still drive the car with the handbrake on, it makes a horrible groaning noise too.

Incidentally, my mate Goran in the car spares shop says the shoes are the same diameter as those in the back of a Fiat Uno... :frown:

Re: The Rattly Tank Passed It's MOT!

Posted: Tue Mar 23, 2010 12:33 pm
by Welly
That sounds like a right old faff about :frown:

As you say, I don't think the handbrake could have been much cop straight out the showroom :roll:

I don't think these drum/disc combos have ever been much good on any car and given that the shoes are never in active use then they'll always feel a bit wooden.

Re: The Rattly Tank Passed It's MOT!

Posted: Tue Mar 23, 2010 8:43 pm
by teamster1975
I'd love to know jasper's method of doing them. I've replaced all the cables, shoes & discs and it's still cr@p.

Re: The Rattly Tank Passed It's MOT!

Posted: Tue Mar 23, 2010 10:21 pm
by jasper5
Fitting handbrake cables is always a struggle, I fitted a set on an 05 Fiesta last week and they were an absolute pain as well.

As far as adjustment goes, on the disc/drum type I always slacken both handbrake adjusters then adjust the wheels inside the drums until they are locked on as far as possible then click the wheel back one click at a time until the disc turns with the handbrake dragging slightly.Then tighten the underneath cable until the disc locks up then slacken it until the disc is just dragging slightly.Then go inside the car and take up the slack on the inner cable, usually end up with 4 or 5 clicks.

I adjusted the handbrake on a BMW 520D last week as well, the car had been serviced at the dealers, customer said his handbrake had never been so good.These BMW have the same adjustment method as the 406 regarding handbrake shoes, except you only need to take out a wheel bolt to adjust the shoes, leaving the wheel on.