How To - D9 Full-Mux Cruise Control Retrofit

Talk about the 406's electrical system, what wires do what, how to add extra functionality, etc.

Moderator: Moderators

User avatar
steve_earwig
Moderator
Posts: 19799
Joined: Thu Oct 04, 2007 6:09 pm
Location: Jastrebarsko, Croatia http://www.jastrebarsko.hr/lokacija/

How To - D9 Full-Mux Cruise Control Retrofit

Post by steve_earwig »

This is kind of a first draught, I'll add the wiring stuff later (this took long enough!) I'm just looking for feedback/criticism and, once we're all happy with it, I'll copy this over into the Knowledge Base.

===================================START=========================================

The car featured in this how to is my December 2003-built (RPO 9891) 2.0HDI 110 lhd estate but the principals should be the same for other 406s. Obviously having only done one car I am no expert, but I did plenty of research on other PSA car sites.

You will need:
A working installation of Peugeot Planet 2000 along with the interface.
The steering column control stalk (part number 6242 Z9)
A redundant brake light switch (part number 1628 7P - it's red) along with its retaining clip (4534 30) - Please note: The clip is the same as the brake light switch's but the switch itself is not. The brake light switch works in the normal manner, that is when the pedal is released it pushes the plunger in and the switch is open circuit. As the pedal is pressed it moves away releasing the plunger and the contacts close, lighting up the brake lights. The redundant switch is the complete opposite of this, as the pedal is pressed the contacts open.

You might wish to look at this, which is the same job on a semi.mux HDi90: http://www.youtube.com/watch?v=giU21PviWJM and also the text that goes with it http://www.peugeotforums.com/forums/mai ... %5D-28067/

BEFORE YOU START!
You should first check on your car to see if this is going to be possible.

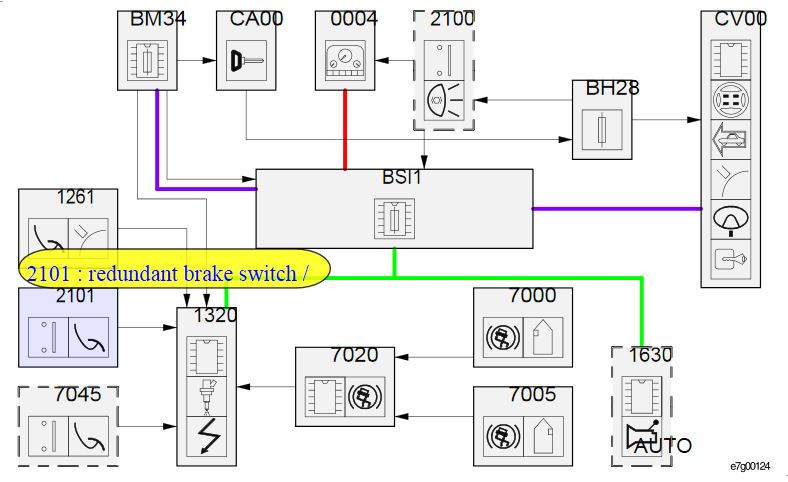
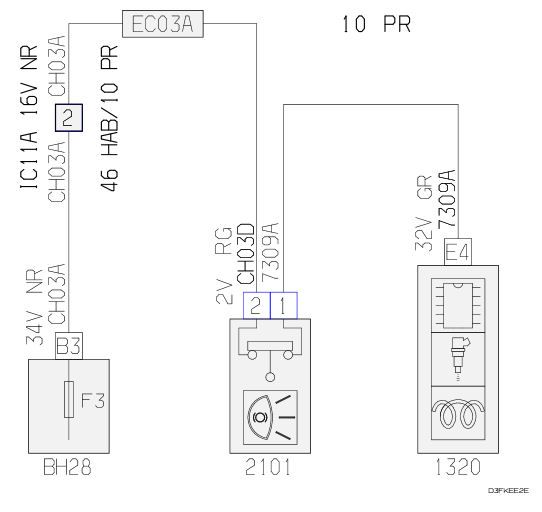
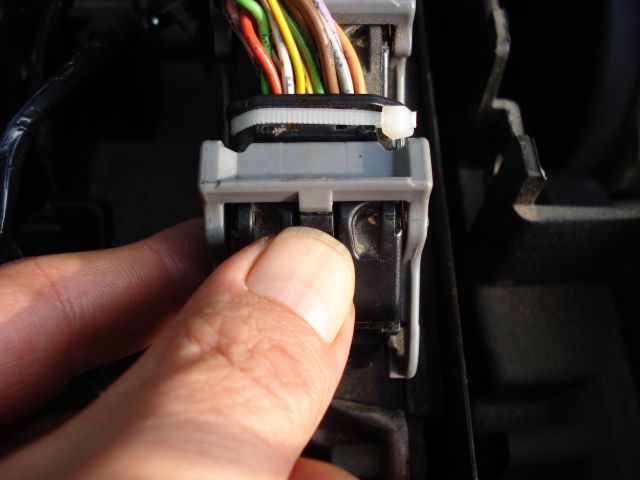
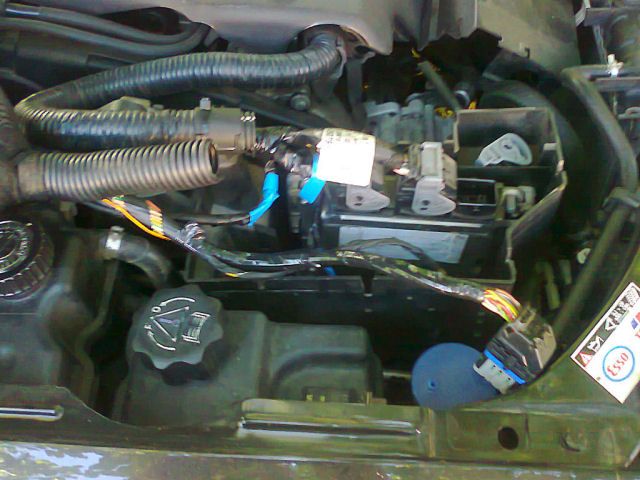
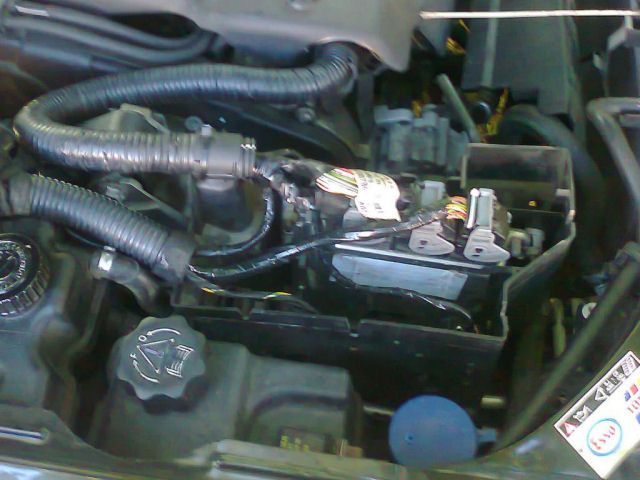
Firstly, check above the steering column for the RED connector for the redundant brake switch. It's the blue one here :roll: labelled with the switch's designation (2101) and the size and colour of the connector (2-way red):
Image
You'll have to remove the bottom sound deadening pad and maybe fish for it, it *should* come out of the trunking below the instrument panel along with the feed for the brake light switch (that's the one next to it). If you can't see it up there don't start taking the dash to pieces, you won't see anything else, PSA probably saved a couple of Centimes and didn't fit it - mine was missing too, it's not the end of the world but it's a fair old job to wire it in yourself.

NB on left-hand drive cars the switches are reversed.

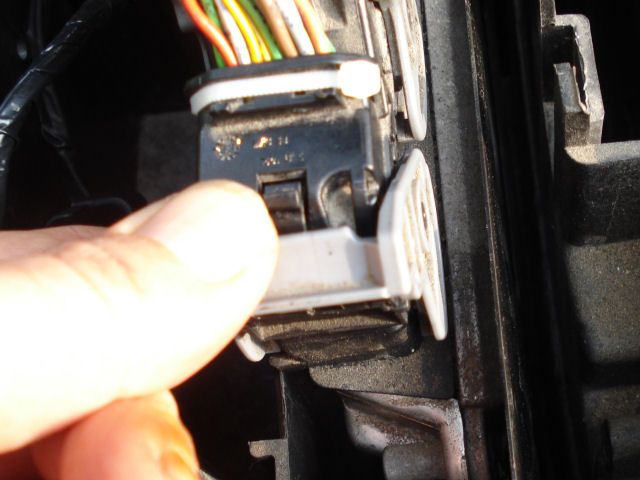
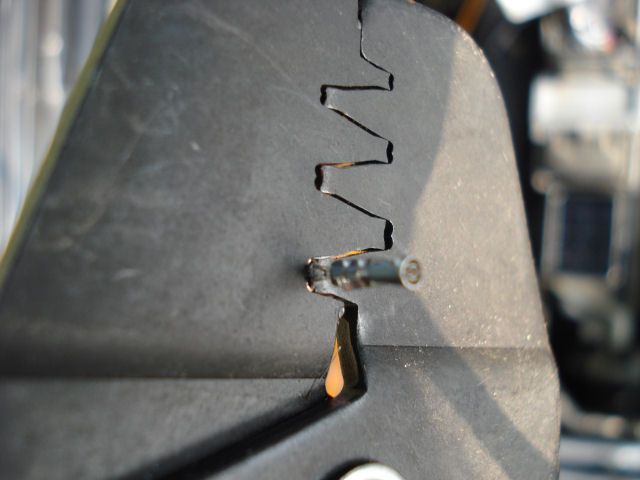
While you're down there, check for the second hole in the bracket for the redundant switch, they're circled, along with the brake light switch, here:
Image
I don't think PSA made a 406 pedal bracket without this but it seems quite common on other PSA cars so I thought it would be worth checking. As it's part of the pedal bracket adding it might be a bit of a pain. Alternatively some later PSA cars have a double switch which might be worth investigating.

Also (where applicable), check for the clutch switch, mounted similarly above the clutch pedal. Note: the "clutch contact input" will probably be set to absent in Peugeot Planet under the BSI, this appears to be normal.

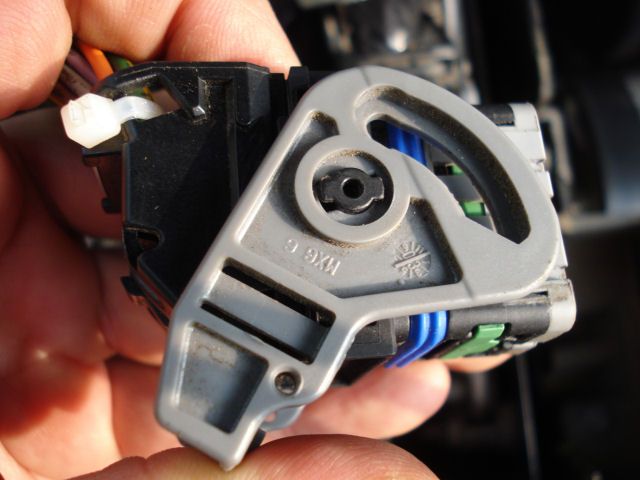
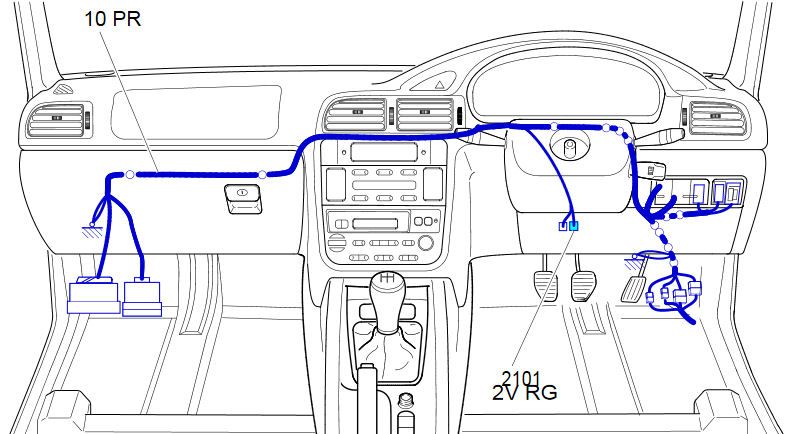
Next, pull off the steering column lower shroud (2xT20) and check that the com2000 has a socket for the stalk - it should be opposite the stereo stalk with a black blanking plug:
Image

Lastly, fire up Peugeot Planet 2000 and check that both the engine ecu and BSI have the options for cruise control:

Engine:
Image

BSI:
Image

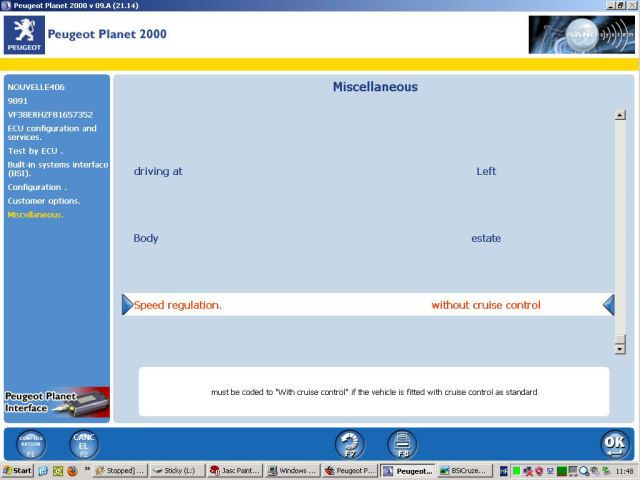
You might wish to check that both can be added but don't leave it like that yet - the car will probably throw up faults as it looks for things that aren't there.

INSTALLATION
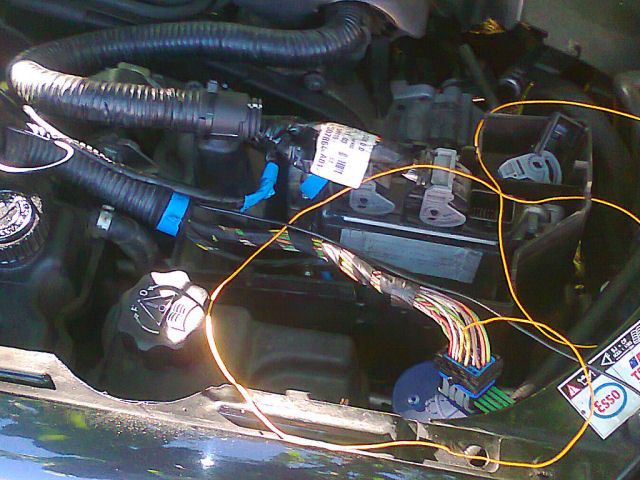
Start off by following the 2 minute rule here viewtopic.php?f=10&t=13431&p=122217&hil ... le#p122217 to disconnect the battery. I'm not sure this is strictly necessary, however the lights still work with the ignition off so the com2000 still has power and I wouldn't like it to take offence.

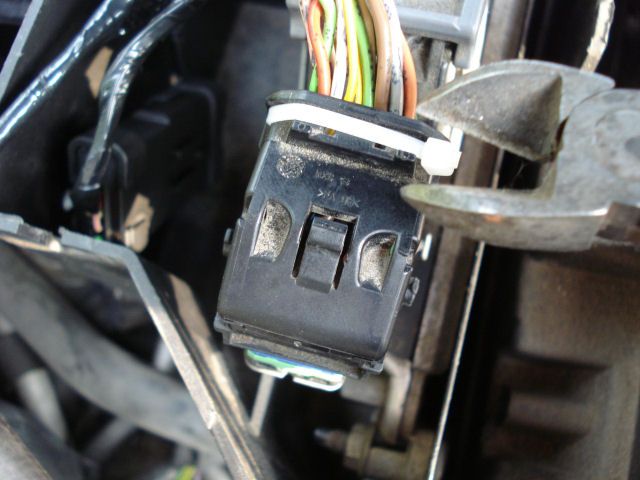
Plugging the stalk into the com2000, it has a nice positive click as it goes in. You'll obviously have to modify the lower shroud now but that's just a matter of making a mirror image of the slot for the stereo control stalk. Anyway, it doesn't need to be there for a test drive.

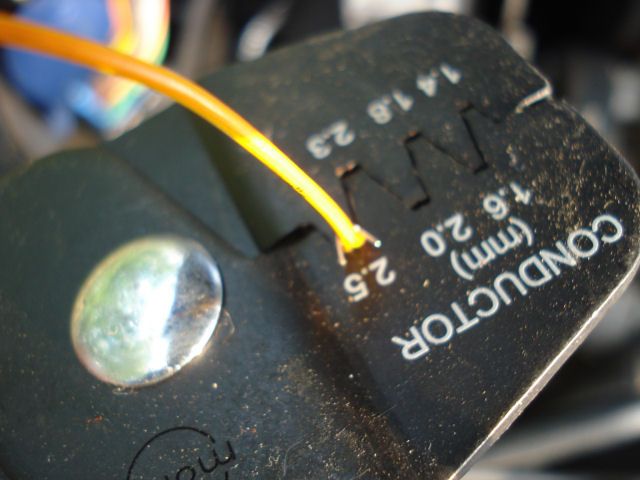
Next comes the redundant brake switch. It's quite hard to get to and some have removed the dash lower panel and removed the bolts holding up the steering column to get it out the way. You might want to fit the connector into the switch before you fit it. put the clip in first, followed by the switch (the rings are concentric so there's no point in turning it). Push it onto the first ring and then you're ready for fine tuning using Peugeot Planet.

Reconnect the battery and fire up Peugeot Planet. Firstly you need to enable it in the engine ecu and the BSI. Referring back to the two diagrams:

Engine:
Image

BSI:
Image

To change the state between present & absent for the engine ecu and with/without cruise control just double click on the line. You will then need to confirm the changes, using the "Confirmation/F1" in the bottom left-hand corner (if you don't do this any changes you make will be lost).

Once you've done these, navigate your way over to this page:
Image
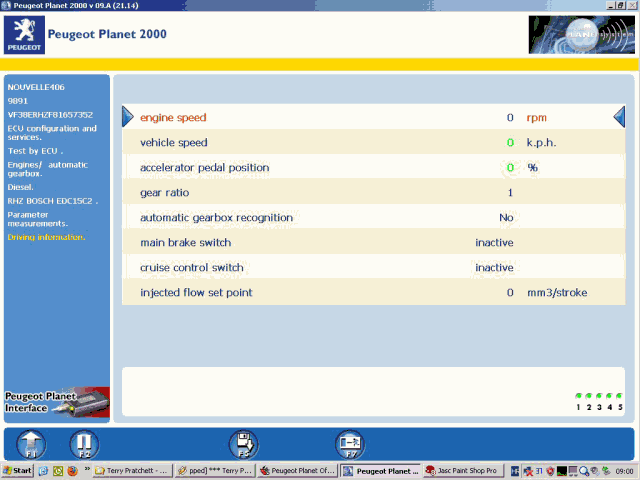
These are the two switches: "Main brake switch" is the brake light switch and "cruise control switch" is the redundant brake switch. At rest they both should read "inactive", then as the brake pedal is pressed first one then the other should change to "active". In this particular animation you can see that first the brake light switch goes active, followed by the redundant and my car works like this, however I'm told by Malc that his wouldn't work like this and threw up a coherence fault under the engine ecu, so I could do with some feedback on this one. Either way, move the redundant switch up and/or down until you achieve the desired effect.

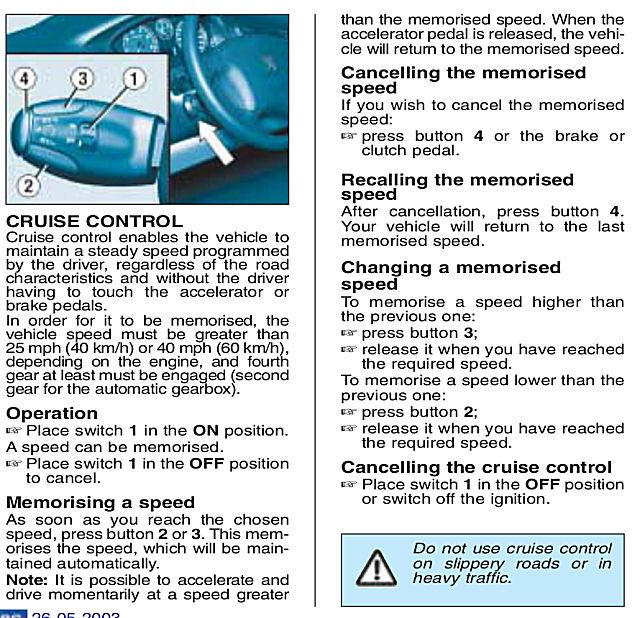
Next you may as well check the functions on the cruise control stalk:
Image
All the switches should do something, the only one I got here was the on/off switch because I couldn't reach the laptop to hit PRNT SCRN for the others.

And that should be it 8) Put the car back together and take it for a test drive. Find a nice straight empty bit of road and try it out.
Image
Test all the buttons and also check that both pressing the clutch or brake pedal cause cruise to cancel.

If you've never used cruise control before I'm told the effect can be a little unnerving to start off with. If you have then you might be surprised to find the pedal doesn't drop away from your foot as the throttle increases: there is no mechanical control to the throttle as it's all electronic.


=====================end========================

So, what do you think guys? Too wordy? Too much detail? Not enough detail? Any glaring omissions?? Perhaps I should add some stuff on navigating within PP, after all this is quite likely to be people's first experience of it (it was mine! :shock: )
Unskilled meddling sin©e 2007

The submitted form was invalid. Try submitting again.
User avatar
Doggy
Mod with a 2.2 HDi, De-Fapped!
Posts: 10710
Joined: Mon Oct 13, 2008 11:49 pm
Location: Northants

Re: How To - D9 Full-Mux Cruise Control Retrofit

Post by Doggy »

Not too wordy, I'd say you've got it spot on.

Really good job, well done Steve. 8)
2002 HDi 2.2 Exec Estate, (2008-12) (wonderful)
2003 HDi 2.2 6-speed Exec Estate (2012-19) (also a gem)
2009 Citroen C5 2.0 HDi VTR+ Estate (godawful heap)
2008 BMW E91 330i touring (great fun - murdered by a reversing SUV)
2007 BMW E91 325i touring (slower smoother quieter)
dirtydirtydiesel
3.0 24v
Posts: 1521
Joined: Sun Apr 28, 2013 11:02 pm
Location: Coalville, Leics.

Re: How To - D9 Full-Mux Cruise Control Retrofit

Post by dirtydirtydiesel »

Excellent info steve :cheesy: .
I'm going to have to look into doing this on mine, thanks for that :lol:
More to fiddle with :roll:
2002 110 HDi estate, Rapier in monaco blue! ( found quite a bit more power :cheesy: ) SOLD I've sorted the airbag light :cheesy:
1998 3.0 V6 SE coupe in Diablo Red ( my baby ) sold
2006 206 1.4 16v sport in Aegean blue ( wife's shopping trolley :roll: )

2006 BMW e61 535d m-sport :supafrisk: run's for cover :lol:
davew
2.0 16v
Posts: 189
Joined: Sat Jul 06, 2013 11:54 pm

Re: How To - D9 Full-Mux Cruise Control Retrofit

Post by davew »

looks spot on to me, nice write up, i've just got mine working i could have done with this a week ago :mrgreen:
Malc
2.0 16v
Posts: 125
Joined: Thu Apr 08, 2010 1:50 am

Re: How To - D9 Full-Mux Cruise Control Retrofit

Post by Malc »

Steve I drew my conclusions on the switch sequence from somewhere in the 406 forum and this excellent video from youtube...

http://www.youtube.com/watch?v=giU21PviWJM
User avatar
steve_earwig
Moderator
Posts: 19799
Joined: Thu Oct 04, 2007 6:09 pm
Location: Jastrebarsko, Croatia http://www.jastrebarsko.hr/lokacija/

Re: How To - D9 Full-Mux Cruise Control Retrofit

Post by steve_earwig »

Nice find! I guess there had to be one. I was expecting much more difference in PP for a semi-mux. And I see my switch sequence is definitely bass-ackwards :roll: Maybe it doesn't matter on later cars :?

Good point about the clutch switch, maybe I should put a line in to check for it...
...and if the wiring isn't there there's not much we can do about it....
That's probably a fair point for a semi-mux, there'd be a hell of a lot more wires to fit :(
Unskilled meddling sin©e 2007

The submitted form was invalid. Try submitting again.
Malc
2.0 16v
Posts: 125
Joined: Thu Apr 08, 2010 1:50 am

Re: How To - D9 Full-Mux Cruise Control Retrofit

Post by Malc »

Steve....Just done a five hour trip and the cruise control worked a treat.
My pug cc stalk has no memory switching so am I reading you correctly all I have to do is change it for the later model stalk and update on pp2K?
I believe the reason for the clutch switch is not only to kill the cruise control if pressed but also it addresses the engine ecu to reduce fuel flow.
One thing for sure it tells the driver to keep his feet well away from the clutch pedal when driving on cc avoiding any unnecessary clutch wear!
User avatar
Doggy
Mod with a 2.2 HDi, De-Fapped!
Posts: 10710
Joined: Mon Oct 13, 2008 11:49 pm
Location: Northants

Re: How To - D9 Full-Mux Cruise Control Retrofit

Post by Doggy »

My bro's semi-mux 110 HDi (X-registration), has cruise which works, but doesn't seem to have a 'resume' function. Anybody know whether it should?

If your car's the same you wont be able to fit the later stalk as it plugs into the COMM2000 unit, (which you wont have either).
2002 HDi 2.2 Exec Estate, (2008-12) (wonderful)
2003 HDi 2.2 6-speed Exec Estate (2012-19) (also a gem)
2009 Citroen C5 2.0 HDi VTR+ Estate (godawful heap)
2008 BMW E91 330i touring (great fun - murdered by a reversing SUV)
2007 BMW E91 325i touring (slower smoother quieter)
User avatar
steve_earwig
Moderator
Posts: 19799
Joined: Thu Oct 04, 2007 6:09 pm
Location: Jastrebarsko, Croatia http://www.jastrebarsko.hr/lokacija/

Re: How To - D9 Full-Mux Cruise Control Retrofit

Post by steve_earwig »

I can only see handbooks for full-mux cars, do they say anything about the memory?
Unskilled meddling sin©e 2007

The submitted form was invalid. Try submitting again.
User avatar
steve_earwig
Moderator
Posts: 19799
Joined: Thu Oct 04, 2007 6:09 pm
Location: Jastrebarsko, Croatia http://www.jastrebarsko.hr/lokacija/

Re: How To - D9 Full-Mux Cruise Control Retrofit

Post by steve_earwig »

Edited again, now it's looking like a huge job for something that's quite easy :( Unless your redundant brake switch wiring is missing...
Unskilled meddling sin©e 2007

The submitted form was invalid. Try submitting again.
User avatar
Doggy
Mod with a 2.2 HDi, De-Fapped!
Posts: 10710
Joined: Mon Oct 13, 2008 11:49 pm
Location: Northants

Re: How To - D9 Full-Mux Cruise Control Retrofit

Post by Doggy »

I've read through it again and it looks fine to me. If I were about to attempt this, your guide would be spot on.

The subject can only be transparent to someone who understands all the working principles and how the engine ecu, BSI, comm2000 and VAN bus interrelate to make cruise work. You can't expect to impart that lot in a simple howto - I think you've got the balance about right.
2002 HDi 2.2 Exec Estate, (2008-12) (wonderful)
2003 HDi 2.2 6-speed Exec Estate (2012-19) (also a gem)
2009 Citroen C5 2.0 HDi VTR+ Estate (godawful heap)
2008 BMW E91 330i touring (great fun - murdered by a reversing SUV)
2007 BMW E91 325i touring (slower smoother quieter)
User avatar
steve_earwig
Moderator
Posts: 19799
Joined: Thu Oct 04, 2007 6:09 pm
Location: Jastrebarsko, Croatia http://www.jastrebarsko.hr/lokacija/

Re: How To - D9 Full-Mux Cruise Control Retrofit

Post by steve_earwig »

Thanks for the encouragement :cheesy: I suppose I'd better get on with the next bit... :shock:

Btw this might sound a daft question but do any of the petrol full-mux 406 require an actuator? Thing is, from what I can make out, the guide should (in theory) apply to any full mux 406 :supafrisk:
Unskilled meddling sin©e 2007

The submitted form was invalid. Try submitting again.
User avatar
RayneR
3.0 24v
Posts: 635
Joined: Mon Mar 28, 2011 1:13 am
Location: Portugal

Re: How To - D9 Full-Mux Cruise Control Retrofit

Post by RayneR »

What about the clutch switch ? At least on my semi mux the brake and clutch switch was there and all the cables for the button and stalk.

ATTENTION this is for a SEMI-MUX 406 from 2000 May

Things i have needed to change/add to retrofit on mine ( I have a topic about my retrofit ):

- Since it's a semi mux there is not COM2000, i have bought the cruise stalk that is independent of the main stalk.

- Dashboard Cruise ON/OFF button ( yes on semi-mux the ON/OFF button is mounted next to the EOBD Socket )

- New/Used Engine ECU with software capable of doing cruise control ( My original ECU didn't have any cruise control feature, so be careful when buying any engine ECU, i had luck because my brother in law have same 406 as me only 3 months different and his engine ECU had cruise control but guess what, his 406 didn't had any cable pre installed for cruise to work very sad :(. )

- I had to go to a garage where they could unlock the new ECU and use it in my car, and then enable the cruise control feature.

- No, you don't need to activate anything on the BSI side since there is nothing to activate regarding cruise (note: i'm always referring to semi mux 406's )

- Drilled the hole on the plastic to install the cruise stalk ( very easy because inside there is circle marked where the stalk should be)

Final result is a cruise control working :)
2000/May 406 Estate 2.0 HDI 110bhp DW10ATED now with 205k km & now with cruise control & now remaped @ 134bhp :lol:
User avatar
steve_earwig
Moderator
Posts: 19799
Joined: Thu Oct 04, 2007 6:09 pm
Location: Jastrebarsko, Croatia http://www.jastrebarsko.hr/lokacija/

Re: How To - D9 Full-Mux Cruise Control Retrofit

Post by steve_earwig »

What to do if your redundant brake switch connector is missing.

This is what I had to do to run a wire into my D9. Obviously as the car is left-hand drive there will be some differences so this should probably be used as a guide only. I'd hope anybody reading this would go through it and gain some ideas from my experience and learn from my cock-ups.

After taking my dashboard to pieces and looking everywhere I came to the conclusion that the connector just wasn't there. This was confirmed by checking the grey connector to the engine ecu, where I found an empty hole where the redundant brake switch wire should have been.

Cruise control synopsis:
Image

2101 (redundant brake switch) electrical:
Image
Note the connection between fuse 3 in the passenger fuse compartment and terminal E4 of the grey 32-way engine ecu connector. That's what's missing.

Incidentally, it seems to be terminal E4 on almost all full-mux 406s, except for the 2.2 16-valve petrol (EW12J4) which is pin M1 on the 48-way brown (MR) middle connector.

Redundant brake switch installation:
Image

Engine ecu connections:
Image

Engine ecu wiring installation:
Image

Opening up the connector.

The ecu connectors are made by Molex and the one in question for most full-mux D9s appears to be this one http://www.molex.com/molex/products/dat ... USINGS.xml. To get into the connector to check for the wire, you'll need to pull off the cover. Next you'll be faced with 3 connectors and it's the one closest to the front of the car (32V GR = 32-way grey) we'll be dealing with here.

First, to release the clamp you have to push down the small clip at the top and rotate the top of the clamp downwards towards the front of the car:
Image

Image
When it gets to horizontal it should make a click, which is it locking, and the connector is now free.

To remove the clamp, the pivots on both sides feature a key, line up both sides with the key, spread it apart slightly and remove it:
Image

Next, clip off the cable tie from the cover:
Image

Then remove the cover. This is held in place by a clip either side:
Image
release these and slide the cover forwards and off.

The connector itself is labelled A to H down both sides and 1 to 4 on the front from right to left. What they've done is, instead of just labelling them 1 to 32, they've used a mapping co-ordinate, so finding a pin is like looking for a street in an A-to-Z :cheesy: This is actually where I made my greatest mistake, the markings on the block are so small I couldn't make them out even with my specs on, so I counted them the wrong was and ended up putting a wire in D4. Fortunately there was no damage done. I was still wondering where I'd gone wrong when I came across this diagram:
Image
which I have marked with the location of E4 on the grey 32-way connector. NOTE WHICH WAY THEY COUNT!

Installation
I needed:
Molex 64322-1029 connector pins
4 meters of .75mm multi-strand wire
Molex crimpers
Various crimp connectors
Soldering iron (w solder)
A knitting needle (seriously)
A hair grip
A pin
Loom tape
Impact adhesive
Nerves of steel.

The Molex connectors here have 2 different sizes of pin. On the Molex link above there's a .pdf drawing and at the bottom of this there's a list of pins used:
Image
A1 to F4 need the CP 0.6 pins and G1 to H4 need the larger CP 1.5. There are also different sites and materials, I went for the .75mm X2s as that's fine enough, and tin plated because I'm not rich, part number 64322-1029. (Btw the 2.2 EW12 would need the bigger 1.5 pins) I tried all the usual on-line electronics catalogues shops but they either wanted to sell me rolls containing thousands of the things or would sell me just a few but wanted to charge me a fortune for shipping, so I ended up buying 10 from ebay for a few pounds. I'd link the seller but they seem to have gone bust :( There is someone selling them on there now but they want a small fortune for them :frown: I used 4 of them: One to try out the crimpers, one because I originally tried 1mm wire but it wouldn't go in the connector, one because I'm a clod and one that's in there now. I wouldn't buy just 1 anyway.

Edit: presently on ebay http://www.ebay.co.uk/itm/10-X-MOLEX-64 ... 51add1e870

The crimpers I used are these ones http://eu.mouser.com/Search/ProductDeta ... 63811-1000 which I had anyway for a rewire I still have to do on a Moto Guzzi from the '70s which also uses Molex connectors. They're not exactly cheap but the real thing is a couple of hundred pounds :shock: You *might* be able to get away with pliers or cheap and cheerful crimpers but bear in mind that the hole they go into in the connector is tiny and barely has room for the pin when it's properly crimped.

Close up:
Image

Image
I'm not exactly sure what the numbers mean, whether it's the size of the conductor or conductor and pin combined, but anyway I started with the biggest notch to get it going and then moved it down a couple so it appeared nice and tight.
Image

Image

I also soldered the pin to the wire. This might seem a bit over the top but the thing is, like most things Molex, insertion is free but the tool to release the clips and extract it again costs a fortune and I didn't want to snag the wire on something, yank it out of the pin, and end up with an empty pin in the connector: that would be disastrous. So I lightly tinned the end of the wire before I crimped it, then flowed some solder onto it and finally crimped the insulation when it was cool enough.

As mentioned above, I originally bought 3 meters of 1mm wire but I soon found that the size of the insulation meant that I couldn't get the pin far enough into the connector, so I soldered on a couple of meters of .75mm I had hanging about and insulated it with shrink wrap tube. On a right-hand drive car you probably only need about 2 meters but I'd still get 3 to be sure.

To insert the pin into the connector you need to release this interlock plate:
Image
Don't ask me what it does because it sure as f.. hell doesn't let you pull the pins out again.

The pin goes into the connector with the open side that you put the wire in facing towards the front of the car (I can't tell you how much sweat it took to work this one out). The pin has to go a long way down into the connector and you can't do this using just the wire (what's that expression, playing pool with a piece of rope?) so, after some searching, I nicked one of my wife's wire hair grips, straightened it out, clipped the bobble off of the end and used that to push the pin. I also used a needlework pin pushed into the bottom of the connector to judge how far down the pin was. There was no reassuring click or anything. I did notice that you can just about see the pin through the hole in the side where the interlock plate was, when you can't see it any more it's in.

As they say, reassembly is the reverse of the aforementioned procedure.

I tried to loom the wire in as best as I could with the existing wiring, I also tidied up the loom with fresh tape and glued down anything loose (that ribbon stuff around the end of the trunking for instance) with a dob of impact adhesive on the end.
Image

Image

Image

On my left-hooker I had to run it in the trunking across the back of the engine bay and down behind the brake servo.

You now need to get the wire into the passenger compartment. I know there are several way of getting a wire through the bulkhead in the Knowledge Base but I looked at where all the wires come through near the pedals and saw what looked like a big blob of mastic, so I started probing it with the first thing that came to hand which was one of the knitting needles that I'd used a couple of times to pull the stereo out. It was pushing 40 degree that day and the mastic was quite soft, with a bit of gentle pressure the needle actually went through the mastic into the engine compartment, exiting where the brake line goes through the inner wing to the l/h front wheel :shock: So I pulled it out, drilled a small hole through it, and used it to pull a couple of feet of single-core telephone wire though, and then I used this to pull the wire into the passenger compartment. Job jobbed, and a lot easier than I thought it would be.

You now need to make of a connector and provide power. For power I used a scotch lock connector to tap into the feed for the brake light switch (on the real thing they use the same fuse), I'm not proud of this and would have preferred something a little better. The problem was there's very little wire you can get to on the bake light feed and, standing on your head reaching up behind the dashnoard, there's a great temptation to take short cuts.

For the connector itself you could probably just use crimped spades but, amongst the wire I had left over from fitting electric seats, I found that the wires used to provide earths to the seat-mounted side airbags use the same red connector, so if you're in the breakers... You'll need both as there's only one wire in each, you can open these ones up (obviously not made by Molex), I had enough spare wire on one to make the feed, the other I just cut the existing wire off and soldered the end of the ecu wire to the spade connector.

Once the redundant brake switch wiring is in place you can carry on with the retrofit procedure outlined above like nothing ever happened :cheesy:
Unskilled meddling sin©e 2007

The submitted form was invalid. Try submitting again.
User avatar
steve_earwig
Moderator
Posts: 19799
Joined: Thu Oct 04, 2007 6:09 pm
Location: Jastrebarsko, Croatia http://www.jastrebarsko.hr/lokacija/

Re: How To - D9 Full-Mux Cruise Control Retrofit

Post by steve_earwig »

'tis done. Not really a how to as I don't expect people to have the same tools as me (especially that crimper which would be a heck of a lot of money to spend for just one job) and the left hooker thing means I have no idea how the right hooker's wiring runs. I've stuck the OP in the KB, once I've got this one sorted I'll copy it over there too.

So, any thoughts?
Unskilled meddling sin©e 2007

The submitted form was invalid. Try submitting again.
Post Reply