Passenger airbag cover
Moderator: Moderators
-
Welly

- The moderator formally known as Welton
- Posts: 15033
- Joined: Tue Jan 10, 2006 12:52 pm
- Location: East Midlandfordshire
Re: Passenger airbag cover
How about some under-brick neonz 
Cars in my care:
2021 Kia Spottage 1.6 Pez Turbo Dual Clutch Gearbox Trickery
2013 Renner Twingo - donkey work
2021 Kia Spottage 1.6 Pez Turbo Dual Clutch Gearbox Trickery
2013 Renner Twingo - donkey work
-
steve_earwig
- Moderator
- Posts: 19813
- Joined: Thu Oct 04, 2007 6:09 pm
- Location: Jastrebarsko, Croatia http://www.jastrebarsko.hr/lokacija/
Re: Passenger airbag cover
Nutters 
Hey, you really need two bricks and make them detachable (one for each wheel )
)
Hey, you really need two bricks and make them detachable (one for each wheel
Unskilled meddling sin©e 2007
The submitted form was invalid. Try submitting again.
The submitted form was invalid. Try submitting again.
-
MagicHands
- 1.6 8v
- Posts: 15
- Joined: Wed Dec 10, 2008 12:44 am
Re: Passenger airbag cover
Hi, im new here, but airbag cover replace like for me was 10 min on scrapyard, Ł5 price for it, way to home 10min, fitted 15min. done.


-
nickm
- 1.6 8v
- Posts: 12
- Joined: Sun Apr 27, 2008 6:32 pm
Re: Passenger airbag cover
It also went the same on my P plate 406 and it looked horrible, i tried to glue it down but it looked so bad i sold the car 'cos i just hated having to look at it!
-
swiss

- 3.0 24v
- Posts: 1000
- Joined: Sat Jun 07, 2008 5:34 pm
- Location: IM IN UR FACEBOOK ADING TEH STRANGES
Re: Passenger airbag cover
Now with pictures!
This week, I are been mostly going down the scrappy. Got there just in time to see a blue coupe get dragged off by the forklift, I shed a tear. But out in the yard I found two D8 saloons in very good condition. I managed to snag myself a passenger airbag cover without the dreaded peel, this afternoon I dun installed it. Being the thoughtful chappy I am, I present my illustrated guide.
Disclaimer: if you follow this and frak up your car or your passenger's face, it's your own fault. Use at your own risk. Bear in mind the model of 406 I drive (see siggy), which may not be quite the same as yours.
Parts
One passenger airbag cover in good condition, available from scrapyard, ebay or Pug dealer.
Tools
Socket set, metric
Flat bladed screw driver, for levering purposes (I used the can opener on me Vitorinox)
Torx keys, metric
Torch
Mole grips
Tea
Cigs
REMEMBER TO UNPLUG YER BATTERY BEFORE YOU START!!
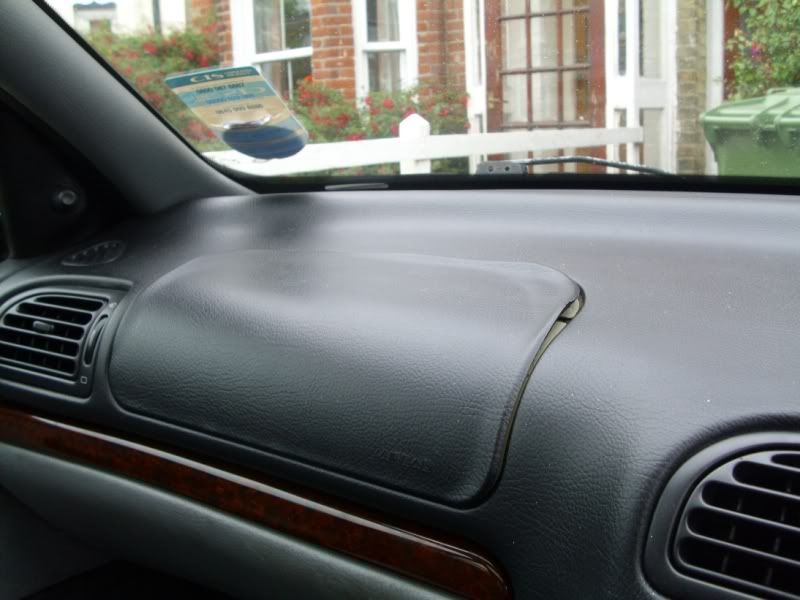
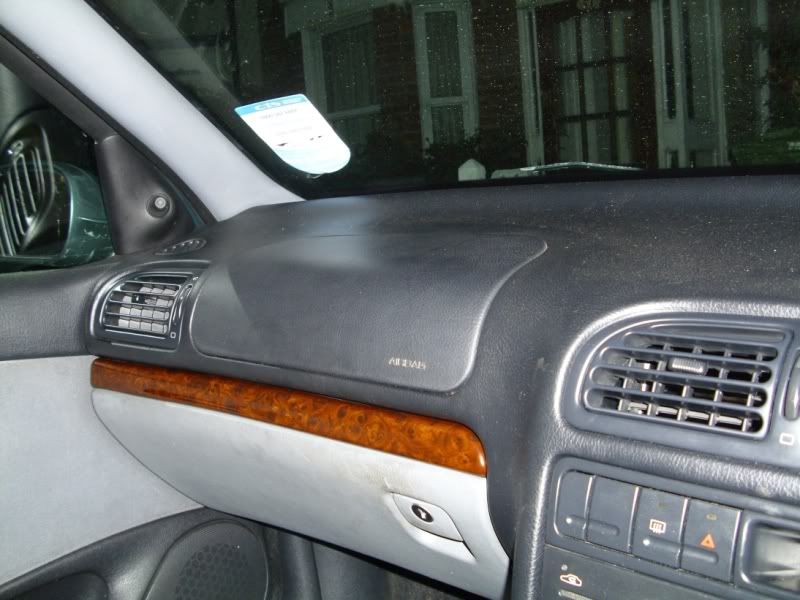
1. Teh Problem.
Here we see my passenger airbag cover in a very sorry state. No way the laydeez are going in to get a car looking like this. Something must be done!
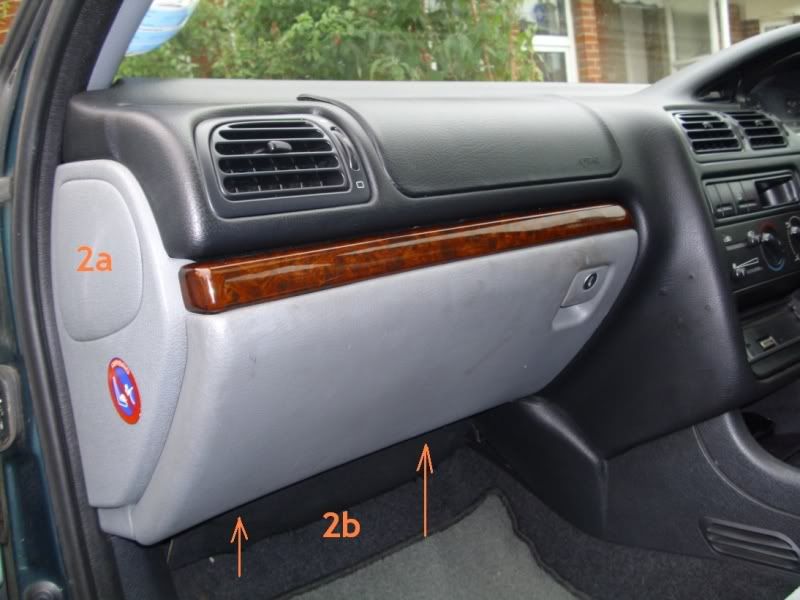
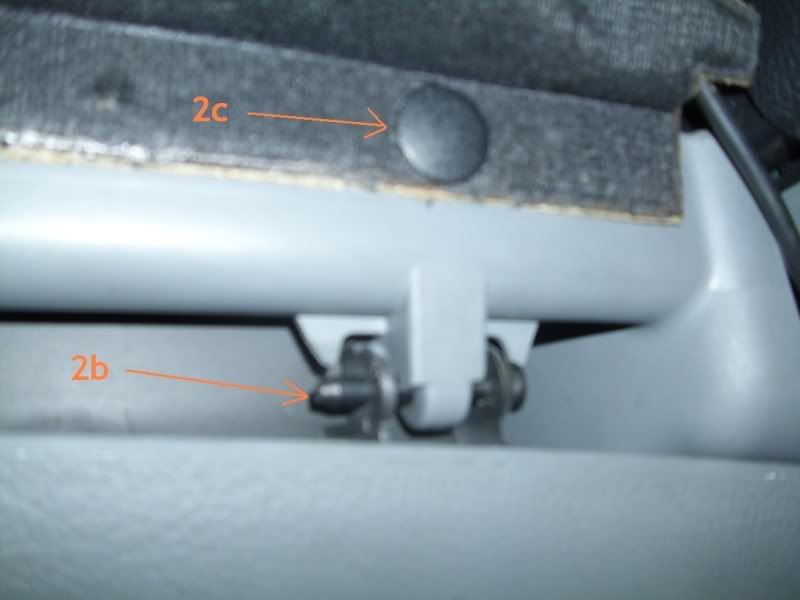
2. The rounded panel marked 2a pops off. Gently insert a screwdriver blade and lever the panel out, taking care not to scratch anything. Now get your head down in to the footwell and look up at the bottom of the glove box. You'll see two black pegs, marked 2b, holding the glovebox hinges together. Get your screwdriver and push the pegs out. Put them somewhere safe. Finally locate three round black pegs (2c) holding in a small piece of carpet. Get your blade and carefully prize them out. Remove the carpet to reveal a mess of wiring.
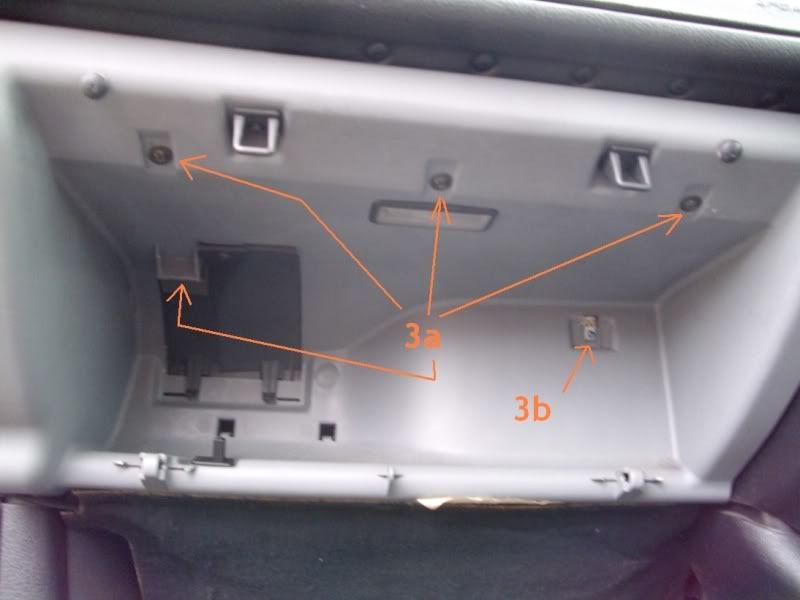
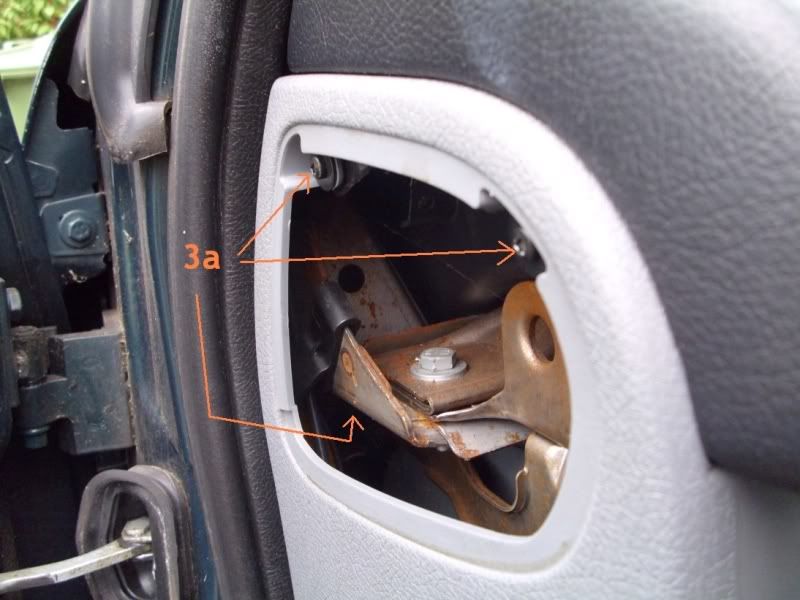
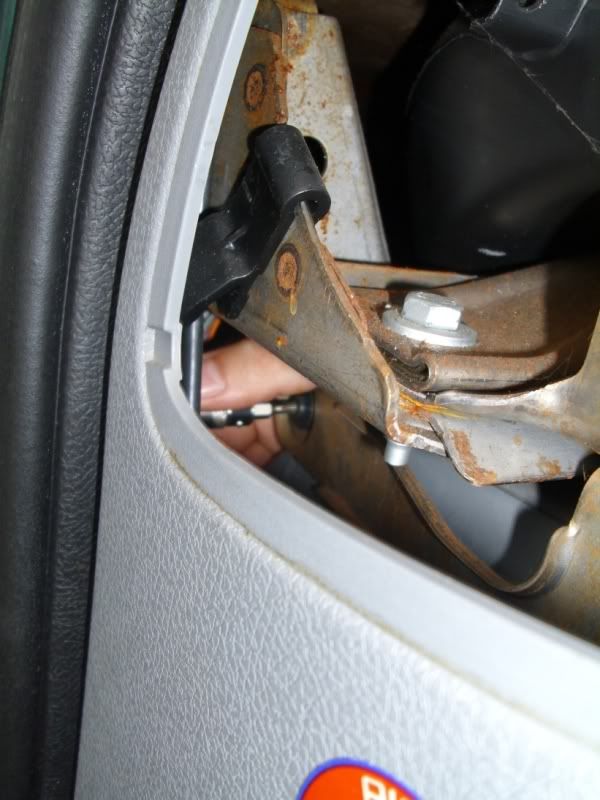
3. Time to undo some torx screws, marked 3a. Once unsecured, remove the black panel. One of the screw is a right bugger to access, I went in with my torx key via the hole where the black panel was (see third pic). 3b, for some reason, is screwed in from behind the panel so I cheated and used mole grips to loosen it then reached behind and removed it by hand.
4. 'Lectrical time. Using your screwdriver, carefully prise out the glovebox light. Disconnect the wiring - the terminal block unclips, so take a moment to look at it and understand how it works, rather than just yank on the wires. Now get down under the glovebox again, and you'll see a black push switch. This registers when the box is open or closed. Underneath the glovebox is another brown terminal box for this switch, which unclips in the same manner.
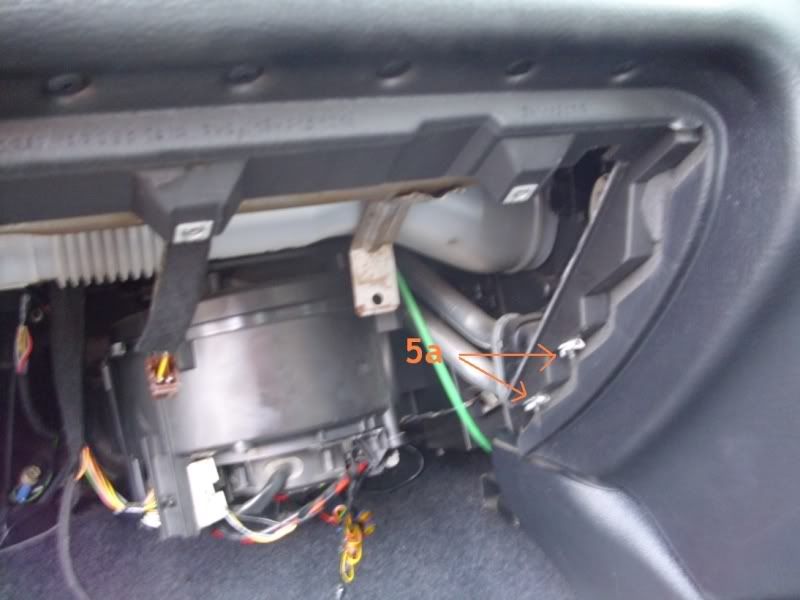
5. OK, this is where it gets ugly. Take a look at the following photo. For some reason, Pug didn't want you to remove this part of the trim so they put two more screws in from behind the panel, marked 5a. Now, if you can get these out then fair play to you. Personally, I got bored and just snapped the buggers right off by pulling on the panel.
6. Back in to the footwell, looking upwards. You'll see the airbag. Towards the top are two nuts - remove these with a 10mm socket on a nice long extension, and store them somewhere safe. It's not possible to to get straight on to these, so take care not to round them off. Might be easier to remove with moleys.
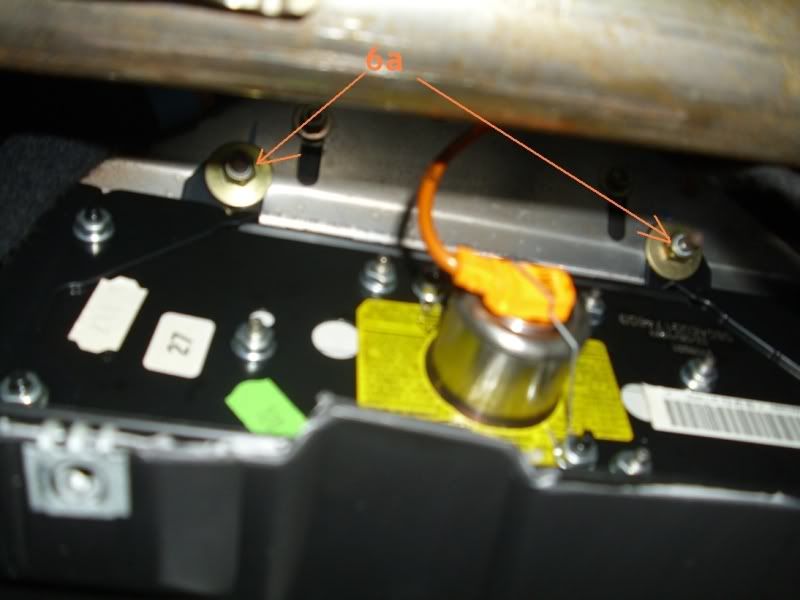
7. Push the airbag up and forwards. You can wedge it up on top of the metal conduit you can see in the photo. This gives you access to four nuts, labelled 7a. Whip these off with an 8mm socket.
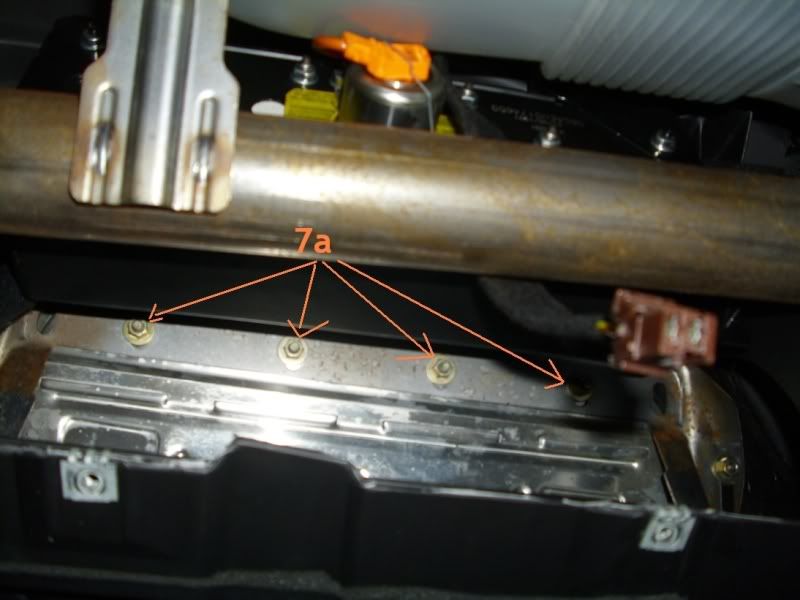
8. Push the cover up from the edge with the studs and unhook it at its bottom edge. Fitting your replacement cover is the reverse of removal, natch.
9. Job's done! Now I have to fend the ladies off with a stick and life is wonderful.
This week, I are been mostly going down the scrappy. Got there just in time to see a blue coupe get dragged off by the forklift, I shed a tear. But out in the yard I found two D8 saloons in very good condition. I managed to snag myself a passenger airbag cover without the dreaded peel, this afternoon I dun installed it. Being the thoughtful chappy I am, I present my illustrated guide.
Disclaimer: if you follow this and frak up your car or your passenger's face, it's your own fault. Use at your own risk. Bear in mind the model of 406 I drive (see siggy), which may not be quite the same as yours.
Parts
One passenger airbag cover in good condition, available from scrapyard, ebay or Pug dealer.
Tools
Socket set, metric
Flat bladed screw driver, for levering purposes (I used the can opener on me Vitorinox)
Torx keys, metric
Torch
Mole grips
Tea
Cigs
REMEMBER TO UNPLUG YER BATTERY BEFORE YOU START!!
1. Teh Problem.
Here we see my passenger airbag cover in a very sorry state. No way the laydeez are going in to get a car looking like this. Something must be done!
2. The rounded panel marked 2a pops off. Gently insert a screwdriver blade and lever the panel out, taking care not to scratch anything. Now get your head down in to the footwell and look up at the bottom of the glove box. You'll see two black pegs, marked 2b, holding the glovebox hinges together. Get your screwdriver and push the pegs out. Put them somewhere safe. Finally locate three round black pegs (2c) holding in a small piece of carpet. Get your blade and carefully prize them out. Remove the carpet to reveal a mess of wiring.
3. Time to undo some torx screws, marked 3a. Once unsecured, remove the black panel. One of the screw is a right bugger to access, I went in with my torx key via the hole where the black panel was (see third pic). 3b, for some reason, is screwed in from behind the panel so I cheated and used mole grips to loosen it then reached behind and removed it by hand.
4. 'Lectrical time. Using your screwdriver, carefully prise out the glovebox light. Disconnect the wiring - the terminal block unclips, so take a moment to look at it and understand how it works, rather than just yank on the wires. Now get down under the glovebox again, and you'll see a black push switch. This registers when the box is open or closed. Underneath the glovebox is another brown terminal box for this switch, which unclips in the same manner.
5. OK, this is where it gets ugly. Take a look at the following photo. For some reason, Pug didn't want you to remove this part of the trim so they put two more screws in from behind the panel, marked 5a. Now, if you can get these out then fair play to you. Personally, I got bored and just snapped the buggers right off by pulling on the panel.
6. Back in to the footwell, looking upwards. You'll see the airbag. Towards the top are two nuts - remove these with a 10mm socket on a nice long extension, and store them somewhere safe. It's not possible to to get straight on to these, so take care not to round them off. Might be easier to remove with moleys.
7. Push the airbag up and forwards. You can wedge it up on top of the metal conduit you can see in the photo. This gives you access to four nuts, labelled 7a. Whip these off with an 8mm socket.
8. Push the cover up from the edge with the studs and unhook it at its bottom edge. Fitting your replacement cover is the reverse of removal, natch.
9. Job's done! Now I have to fend the ladies off with a stick and life is wonderful.
The man with no car
"Close the door on your way out, and don't forget your monkey."
"Close the door on your way out, and don't forget your monkey."
-
steve_earwig
- Moderator
- Posts: 19813
- Joined: Thu Oct 04, 2007 6:09 pm
- Location: Jastrebarsko, Croatia http://www.jastrebarsko.hr/lokacija/
Re: Passenger airbag cover
swiss wrote:Personally, I got bored and just snapped the buggers right off by pulling on the panel.
Very nice yung maan
Unskilled meddling sin©e 2007
The submitted form was invalid. Try submitting again.
The submitted form was invalid. Try submitting again.
-
swiss
- 3.0 24v
- Posts: 1000
- Joined: Sat Jun 07, 2008 5:34 pm
- Location: IM IN UR FACEBOOK ADING TEH STRANGES
Re: Passenger airbag cover
Well, suffice to say when I was dealing with the steering wheel airbag I was a bit more respectful seeing as I was sitting in the driver's seat at the time. Thing was it took me over an hour from d/c the battery to actually access the airbag. I did start to dismantle the centre console in an attempt to access the two offending screws then, well, like I said.
Also picked up an indicator stalk with horn and front fogs from an elderly Xantia, so t'was a good scrounge, that one.
Also picked up an indicator stalk with horn and front fogs from an elderly Xantia, so t'was a good scrounge, that one.
The man with no car
"Close the door on your way out, and don't forget your monkey."
"Close the door on your way out, and don't forget your monkey."
-
Bundy
- 1.8 16v
- Posts: 55
- Joined: Sat Sep 05, 2009 12:12 am
- Location: Aberdeen
Re: Passenger airbag cover
lol, the guy at my local scrappie used to charge you between a fiver and a tenner for anything and everything, then "a fiver for the toolbox" for all the little scroungable things you'd squashed into your toolbox during your walkaboutswiss wrote:
Also picked up an indicator stalk with horn and front fogs from an elderly Xantia, so t'was a good scrounge, that one.
Man: What shall i wear?
Woman: Oh for god sake, you're not a child, i'm sure you can dress yourself!
5 mins later.
Man: Right then, what do you think?
Woman: You're not seriously going to wear THAT are you?
Man: Well i did ask you!
woman: <sigh> Come on, let's go dress you PROPERLY...
Man: WELL I DID ASK YOU!
Woman: Oh for god sake, you're not a child, i'm sure you can dress yourself!
5 mins later.
Man: Right then, what do you think?
Woman: You're not seriously going to wear THAT are you?
Man: Well i did ask you!
woman: <sigh> Come on, let's go dress you PROPERLY...
Man: WELL I DID ASK YOU!